With so much going on in game 2, it’s hard to remember exactly how the Miami Heat were able to steal the win from San Antonio. I thought I would make a play-by-play analysis of those incredible final three minutes. Now that we know there’s a happy ending to this story, we can hopefully enjoy the excellent level of basketball which was played.
Play 1: Floppy
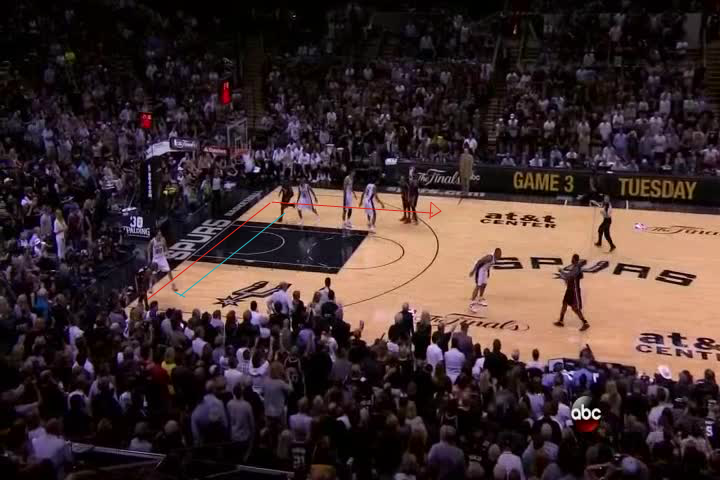
So the Heat chose to run a ‘floppy’ play. For those unfamiliar with this alignment, I made these diagrams to help explain.
Allen decides to take the staggered screens from Bosh and Andersen, though Bosh actually dives in to the low-block to take advantage of his mismatch with Green, and we see Allen curl tightly around the Andersen screen to get the ball inside the paint.
Now you may be wondering why Duncan comes off of Andersen. Basically here Duncan plays the role of the “two-nine”. It’s his job to clog the driving lanes for someone like LeBron, who may be able to drive past the slower Diaw, and to deter him from trying to enter the paint.
Duncan decides to do this as Bosh dives to the low-block, instead of setting a screen for Allen. This explains the second reason Duncan decided to clog the lane:
By only using one screen, Allen will almost definitely go into the paint (a single screen usually isn’t enough to get a three point look at the top of the key). We see Duncan actually covers Allen very well, but credit to Allen for making that tough over-the-shoulder pass.
This was good defense by the Spurs, but better offense by the Heat (Allen in particular).

Play 2: 1-4 UCLA down 41 (DHO)
Parker passes to Ginobili before making the UCLA cut. Ginobili waits to check if Parker can receive the ball, which is always unlikely as this is easy to defend, before passing to Duncan.
Now Ginobili wants to set a down-screen for Parker, but watch how Wade interferes with this plan.

Parker now has to run around Wade to receive the dribble handoff (DHO) without coming off of a screen.
What effect does this have?
Well, it means that Parker can’t get as much separation from his man as he would like and his defender will be in a better position to cover whatever he does.
This play also shows us how quick the Heat were to switch defenders. This disturbs the rhythm of any sets and it basically asks the Spurs to play more of an iso game to try and exploit any possible mismatches they may have.
Now all of this great defense is ruined when Andersen decides to needlessly help one pass away.
Parker gets the open three, but I’m sure the Heat would still take this over a shot in the paint.
Play 3: (High floppy trip).
When we see this set-up, we usually expect one thing from the Heat: Allen makes the deep cut off of a Chalmers’ screen, before curling towards the top of the key off of the staggered screens.
This triple screen action is a play the Heat run all the time for Allen, but here we see a modification:
Instead of setting the third screen for Allen, Wade makes the sort of shuffle cut towards the strong-side.
What does this achieve?
Well a lot of teams will switch out on the last screen, because they are worried about Allen being left open, so here Leonard would switch onto Allen. If they do that here, Wade will be left open at the left elbow and he can get a basket.
Wade’s action also has the advantage of sucking in Duncan, remember his role is to prevent any activity in the paint.
Allen sets the pick for LeBron. Usually LeBron would look to penetrate, but here he notices Bosh is open so he dishes it to the corner.
Bosh misses, but he got a decent look.

Play 4: Motion Weak
Here we see the Spurs run “motion weak,” which just means that Parker will bring the ball up before making a shallow cut to the weak-side wing to receive the ball. Duncan screens for Ginobili, but the Spurs are unable to get anything as Bosh and Wade switched.
As the clock runs down and no options are available, Parker is left to play iso against James.
James does a good job of backing off of Parker when he’s on the perimeter, before containing his drive and forcing him outside of the paint. He then forces a turnover.
This guy’s not bad…
Play 5: 1-3 P&R
The advantage of running a P&R with James and Chalmers, is that it forces Duncan to make a choice: Help protect the paint if James is able to penetrate or stay on Bosh.
The Heat know that Duncan will always choose to play the role of the “two-nine”, and the result is a Bosh open look.
Play 6: 21 Hook into P&R
This shows the incredible defensive ability of Bosh. Ginobili and Duncan run a P&R, and Bosh aggressively hedges as he always does. Here he does this really well as he sticks with Ginobili, thus allowing Allen time to recover onto him, whilst also covering the passing lanes to Duncan.

Play 7: 1-3 P&R
Obviously another advantage of having Chalmers set the pick is that it forces Parker into the action.
There’s no way Parker can contain a James drive, so this means that LeBron’s defender, here Leonard, will be forced to fight over the screen and help contain James.
Here Leonard backs off slightly to try position himself over any potential screen, this gives up enough room for LeBron to drive. Leonard is forced to foul.

Play 8: Motion strong (same)
So Parker stays on the strong-side and cuts to the same side corner. The Spurs make their usual ball-reversal. Ginobili falls over and the play quickly disintegrates. Ginobili attempts a contested mid-range, apparently those aren’t particularly good shots, and it’s all easily defended by the Heat.
Play 9: 4-1 “Low” Motion Offense
Now we see San Antonio is very unsure about how to defend this. Diaw half attempts to trap James. This leaves Wade open who does the right thing by positioning himself at the low post.
Here every player can pass to him.
Bosh drives past Duncan and this forces Diaw to come off of Wade so that he can contain the drive and contest any shot by Bosh. Bosh obviously anticipated this and he makes the nice bounce pass to Wade.

Play 10: Sideline Out of Bounds (SLOB) Wheels
Green, who was perhaps nudged by Wade, cuts to the top of the key as a decoy before Ginobili curls around the opposite direction of Duncan.
Once Ginobili receives the ball, Allen contains his drive before keeping his hands up as Ginobili clutches the ball, thus preventing any shot from Manu.
Diaw wastes too much time, but he’s able to get the rebound and dish it out to Ginobili for the useless buzzer-beater.
WHO CARES, WE WON!!